In following you see the readme file contained in the directory /usr/local/bin in the images or in the tar ball.
This is the documentation to project bechele.de
Further infos under www.bechele.de
Author Rolf Jethon
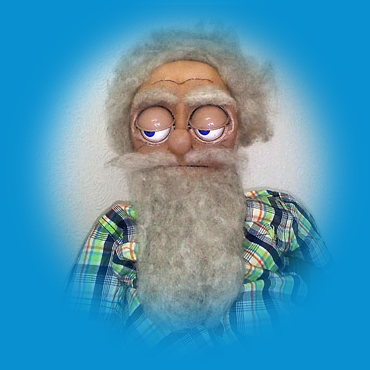
bechele,de is a Raspberry Pi project, that enables you to create movement models
like hand puppets, dance puppets or animal robots with simultaneous output of
audio data and awake it to life, without the need of programming.
Instead of a Raspberry Pi a OrangePi PC can be used - therefore a separate SD
card image exists.
All required project scripts reside in folder /usr/local/bin.
Basics
To move a movement robot syncronized to music or speech, it is required to add
the movement in some way according to the tone. In this project this happens by
moving a joystick by hand synchronous to the sound. At the same time the
movements will be output to the servos to be able to check the results on the
fly. The number of recording channels is limited to a maximum of 16 according
to the project. In case of the puppet Mr. Bechele, the number of Servos in use
is only 4. This limitation is just coincidencial and not a limit for other
projects. One servo for the eye movement up-down, one for eye movement
left -right, one servo for the lid movement and one for the mouth movement.
My new puppet (almost finished) uses 8 channels for example. Because with a
joystick only two channels can be recorded, the recording of all channels need
to be done sequentially. In case of Mr. Bechele I recorded first the mouth
movement according to the speech audio mp3 file. Because mouth movements are
very quick they need full concentration to acieve a more or less accurate
result. Therefore I just recorded one channel only though I had two channels
available. Then I recoreded the eye lid movement with also only one channel.
Finally I recorded the eye movement with two channels at the same time. The
audio data was divided in single short sections, to allow the puppet player to
respond in the speech pauses. After finishing recording, audio data and movement
can be output step by step by pressing a button, so that the audience has the
impression the puppet talks really to the puppet player.
Working principle:
A movement set consists always of a mp3 sound file, and a .svo file that
contains the movement information for the servos. Optionally a text file with
the same name may exist, that contains text hints for the puppet player - in case
you don't want to learn all the dialogs by rote. This text will then be shown on
the terminal window, you started the program from.
In the first version of the project, the positions of the joy stick were passed
directly to the servos. There the value range of the joy stick needed to
coincide exactly with the servo position values. This had the following
disadvantages:
- The whole movement range of the servo needed to be possible for the servo.
- Different servo types could not be combined if the parameters differed.
- After changing mechanical parameters of a servo or joy stick, a mecanical
re-calibration was required.
- Mechanical changes required a re-recording of the concerned movement.
Therefore joy stick movements as well as servo movements will be parametrized
and normalized to a range of 0 to 4096 in file ConfigL.pm. If for example a
mouth movement of a puppy was realized, so that 2/3 of the possible angle range
of the servo was in use and after a mechanical change just the half of the
angle range is needed, existing movement file can be re-used without any change,
by adapting the servo parameters. The same applies if the joy stick changes.
The positions of 0 to 4096 in a movement file contains the complete possible
mechanical movement range of the servo in the model. In other words: The servo
-despite parametrized correctly- does never try to exceed its mechanical
limits in the model.
------------------------------------------------------------------------------
Installation:
The easiest way is to write a pre-defined SD card image to a SD card and you are
almost ready to go. For those who want to install themself, expect a time
consuming installation marathon:
Unpack the tar ball into / (root) of your distribution.
Depending on the linux distribution some software needs to be installed.
How to install that depends on the distribution.
you need:
cpanminus (required)
WiringPi (required for RaspBerry Pi)
git (required for OrangePi)
make (required for OrangePi)
gcc (required for OrangePi)
WiringOP (required for Orange Pi - install with:
git clone https://github.com/zhaolei/WiringOP.git -b h3
after that > cd WiringOP < und anschließend > ./build <)
now > echo '/usr/local/lib' >> /etc/ld.so.conf.d/randomLibs.conf <
and > ldconfig <
test with > gpio readall < all gpios should be displayed
)
alsa-utils (required)
mpg123 (required)
i2c-tools (required)
perl 5 (probably pre-installed - required)
perl-device-serialport (required)
Further you need to install some perl modules - easiest is to use:
cpanminus
Many modules depend on other modules, so that the installation may take a while.
PERL MODULES:
strict
Device::SerialPort
Curses::UI
WiringPi::API (Version 1.05 - for Orange Pi PC the latest version does not
work);
File::Find::Rule
Device::PWMGenerator::PCA9685
Audio::Play::MPG123
Time::HR
ConfigL (This comes along with the tar ball and does not need to be installed)
After the installation, some parameters need to be set - see section
configuration.
------------------------------------------------------------------------------
Programms and their function:
trackui.pl:
This program processes on demand all mp3 files from the directory that has
been passed as parameter during program start. To ease the use a quasi
graphical user interface is in use (curses), that also works over a terminal
program (for example putty).
Depending on complexity of a model or a puppet, movements will be generally
aquired sequentially. Probably nobody may control all servos simultaneously
so a correct movement results.
By using the user interface it's possible to combine movements. For example
several servos may execute the exactly the same movement. The movement
control of a servo group may be assigned to a joy stick axis. This is for
example necessary if a puppet has seperate servos for each eye lid. You don't
want to record each lid seperately but record them togehter because they
almost move together. If for an exception one lid shall be moved different
from the other, you may record one eye lid in a subsequent record cycle by
just defining a limited range, instead of the complete number of movement
steps within a single MP3 file. Depending on the number of servos and the
complexity of your movements, you may repeat recording as often as you like
with servos activated or de-activated as you need until the movement fits to
the sound as desired.
control elements of trackui.pl:
Section File:
Here you define the file (.svo) to process. Usually you will process the
files defined by selecting a folder as a program start parameter.
With << Prev Next >> you may move through the folder. The requirement is alway
a existing MP3 file. For this file a belonging .svo file will be created or
modified. If a .svo file already exists this may be output or modified.
With the double arrows you may move in steps of 10 files. This is helpful if
you want to navigate to a desired file quickly, because solution dependent,
processing single files may be impossible or pedestrian.
Save saves the .svo file finally.
Operation elements on the joy stick:
Key right: starts recording or viewing (trigger).
Key left: stops recording and returns to the menu.
Section Channel X:
Here you may activate the servos, that shall be recorded during the cycle by
moving the joy stick X-direction. This is almost only one servo, but several
may be selected. These will then be moved and recorded simultaneously.
Section Channel Y:
Like Channel X, but here the Y-direction of the joy stick will be used for
controlling.
Track Sets:
A track contains all movement steps that corrospond to a mp3's play duration.
In the default setting, movements will be recorded every 50 ms. A 20 second
MP3 results then in 400 movement way points.
Start at set: Is the start time of a record in steps of 50 ms.
Stop at set: Is the stop time in 50 ms steps.
The Check box Update activated controls that after the very first record in
a new MP3 the time points will be automatically determied and updated.
The Check box Full range allows independent of the fileld values to record or
view the complete movement duration.
Status:
Here useful program messages will be shown.
Process:
Record starts a recording according to the servo activation. Not activated
servos will be played only. All servos de-activated is the same like 'view'
View outputs a MP3 and movements only.
The program exits with Ctrl-Q
live.pl
This program outputs during the presentation the sound along with the
recorded movements. The sorting of the files follows the ASCII sequence.
The program will be only controlled using the four buttons of the control
button. The joy stick is not needed and normally disconnected.
Button 1 :
Start of the first sequence or switching to the next sequence.
Button 2 :
Start of the previous sequence
Button 3:
Repeats of the previous sequence with output of the repeat prefix sequence
from folder "repeat" of the output directory. If more than one sequence
resides there the following sequence (mp3 file) will be uses as a prefix.
The idea is to have a possibility to repeat a sequence if it was for example
too loud in the audience to understand.
Button 4 :
Outputs the next sequence in folder "extra" of the output directory.
If several sequences are stored there, with each repeat the following sequence
will be output. Folder extra may be just a laugh or a reaction sequence to the
audience.
servokalib.pl (2-channel) and servocalib-single (1-channel)
This program is used for a first test of new servos and to deteermine the
servo and joy stick parameters. It is more or less self explaining. Here you
need to have the joy stick connected.
Operation elements on the joy stick:
Key right: switches the joy stick to the next servo.
Key left: switches the joy stick to the previous servo.
X-pos(0-4096) |Y-Pos(0-4096) |Joystick X |Joystick Y |Servo 0 |Servo 1
-----------------------------------------------------------------------------
2714 | 1602 | 460 | 317 | 438 | 307
In file Modules/ConfigL you need to enter the limits - see the hints in the
file itself.
backup
Shell script that saves the actual configuration as a tar ball in:
/usr/local/backup
activate_autostart
running this once under Archlinux, the program live.pl will be started
automatically after booting. This is helpful if no terminal is connected to
the raspi.
runs only on distributions that support systemctl.
deactivate_atostart
De-activates the automatic boot into live.pl
cksum
helper file that checks the file integrity of .svo files.
Record tips:
Create your audio files with a longer silence at the end. So the puppie may
continue to move while the puppie player responds. When the button for the
next sequence will be pressed, the current will be stopped immediately and
the subsequent one starts. Better record the model movements a bit longer, so
the puppet does not look "static" in speech pauses.
------------------------------------------------------------------------------
Configuration:
After installation parameters perhaps need to be modified, before you may start
with playing or recording.
Setting up program parameters:
Serialport ($serialport) - According to the hardware in use.
i2c port ($i2cport) - According to the hardware in use.
i2c Adresse ($i2c_address) - According to the address in use. (tip: detect with
i2cdetect )
Setting up the number of servos in use:
Edit file: /usr/local/bin/Modules/ConfigL.pm
Change the entry:
$num_servos=4; # number of servos in use (max 16)
Of course you need these Servos attached.
Setting up the joy stick.
Assume a joy stick delivers at minimum position a value of 123 and 855 at
maximum. By entering these values into ConfigL.pm, these values will be
converted internally into 0 to 4096. If you move the stick to minimum a inner
value of 0 will be used and if the stick goes to maximum a inner value of 4096.
Adapt in ConfigL values:
$joystick_x_start $joystick_y_start $joystick_x_end $joystick_y_end
Setting up a servo:
With servos we have the following parameter sets:
1. The whole possibe movement range of a servo (not mounted in the model).
This is used to parametrize the servo type so when running servocalib.pl,
the servo is already preset and reacts accordingly.
(servolimit start + servolinit end)
2. The possible movement range within the model.
This is used to limit the servo movement inside the model in its mechanical
limits, so the servo does not try to overrun the mechanics.
(servostart + servoend)
3. The movement direction. (1 or 0).
O outputs the movement like the joy stick.
1 inverts the movement opposite to the joy stick
3. Servolabel: Here you may enter a text that later names the servo in trackui.pl
Tips for setting up:
- In any case prevent the servo from trying to exceeds its mechanical limits.
Especially cheap servos like SG90 don't appreciate that and burn trough.
- First set up the joy stick using servocalib (without connecting servos) and
then set up ConfigL.pm. Check in a second run, if you reach 0-4096.
- Only then connect !one! servo, put the stick to the middle, determine the
limits and enter them into ConfigL.pm.