First of all many thanks to the MagPi editorial staff for the article. Unfortunately some things have been incorrectly published about the bechele project in MagPi issue 141 may2024, that I want to correct here:
- I am not an engineer, I am a maker, and worked for a long time as a service technician. This is incorrectly stated in the article from Page 12 to 15.
- I did not spend hours to calibrate the motors, Servo calibration rather saves hours by previously calibrating the servos, since this aligns the maximum positions of the joystick with the maximum position, within the mechanical limits of the servos.
- The number of servos is not limited to 64. It is the number of servos you can drive without any extra effort. Theoretically the number can be much higher. 64 servos is just the default, but this may be changed in the configuration to any number from 1 to 1024. However a high number of servos will imply additional considerations. In case somebody plans to drive more than 64 servos, I would propose to contact me.
- For my impression it did not become clear, that the bechele project is mainly software and has a wide application field. Ventriloquist faking is just one possibility. The bechele software is always right, if you need to syncronise many servo movements to sound.
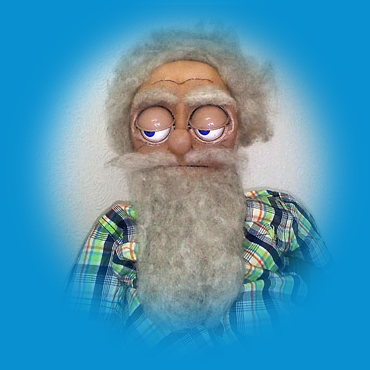
- The eye balls in the recent projects are 3D printed. Only in the very early puppets I used roll on deodorant balls as eye balls.
This is what I sent to the MagPi editorial stuff:
MagPi Project Showcase questions
Questions
Please tell us about yourself and your technical background as well as what got you interested in Raspberry Pi.
Rolf Jethon,
born in 1962 in Ergenzingen, rural district of Tübingen, South-West Germany.
After scool I started my education as precision mechanic, but after finishing, I was working for only two years in my profession, then I changed into technical service.
In technical service I was working for more than 35 years for different companies. It was always my passion beside my job, to design and build interesting hard and software projects.
From my job I came 1994 in touch with Unix, at that time SCO Unix. From the beginning I loved the working concept of Unix. When Linux became popular, I was mesmerized by the open source idea. To easily perform tasks in Linux, I found perl as perfect for me. Therefore I was also happy to see the upcoming of RaspberryPi and I felt familiar with it from the beginning, not just, because it came with all the well known tools of linux, but also it provided a cheap, space an resource demand reduced way of realizing projects. I especially appreciated and still appreciate the possibility to use the Raspberry Pi as a headless, but sophisticated “worker” in the background.
With the start of 2024 I actively quit my job as service technician and plan to stay home as house husband till my retirement.
What were the project aims? Please describe its capabilities and Raspberry Pi’s role (and any limitations you’re trying to overcome or extra functionality you intend to add).
The idea for the project developed in autumn 2014 because the 80st birthday of my mother was ahead and I decided to perform something for her birthday party. Already for the 80st birthday party of my father im May 2013 I build a hand puppet, that needed to be treatened by hand as usual for ventriloquists. Though I thought I was prepared well, I forgot part of the text, coudn’t master the ventriloquism and the performance stuck several times. Finally this brought me to the decision to make it better for the party of my mother. So soon the idea was born to build a puppet that talks to me and does the face movement for its own. The whole thing should work mainly fully automated, means eye mouth and face movements should be recorded before and follow a prepared conversation. My task was finally just to ask the puppet (Mr. Bechele) the right questions. However I again stuck, but not as bad as with the manual puppet at the birthday of my father. Show business wants just to be learned ..;-)
Why did you choose to use a Raspberry Pi for this project and which Raspberry Pi are you using?
To realize the Design idea it became relatively quickly clear for me, that a raspberryPi is the device that had all the preconditions I needed:
⦁ It has the GPIO to do some external hardware control
⦁ It has an audio output to deliver the sound
⦁ It is small and fits therefore into the puppet head
⦁ It may work headless – because working on a screen with “Audience” would not really work
⦁ It was cheap and did not require expensive software
⦁ And the embedded OS and tools allowed easy development of my own application.
For the first version of the bechele project I chose the raspberry 1b – since it was in 2014 the device of “best choice”.
Please tell us about any other Raspberry Pi projects you’ve designed or ones that inspired this one.
All the parts, hardware and software have been made by my self. Of course without open source support of Linux, Gnu Software, Perl and many free software libraries – the project would not have been possible.
Over time I had a few other projects I realized using a raspberry Pi, but these are all projects to solve tasks and problems from my from my direct environment but they are surely not “public proof”. Regarding the current project I cannot remember which other project inspired me to build this one, apart from what I explained already, but that’s perhaps also too long ago.
Were there any particular challenges/advantages in designing it?
One challenge was to drive a number of model servos. There I found some nice additional hardware, often used for arduino projects – these are the PCA9685 PWM PCBs. Also it was a kind of challenge to drive the PCA9685 via the integrated i2c bus of the Raspi. In the earlier versions I used the perl library called Device::Chip::PCA9685 , but this library is very slow loading and a pain to install, because it has huge precondition demands. So finally in the latest version I went over to write my own chip driver in Perl, which by the way easily may drive up to 64 PCA9685 PCBs in one go (1024 Servos).
Is the design based on an existing project or did you have to design and create some or all the parts yourself?
See further up …
How/where did you source the parts and software for it?
The hardware parts for the first eye mechanism came from different sources. The eye balls for example came from empty deo rollers. In addition I used some wires, screws and parts from my box of odds ands sods.
Later, during project development, I went over to use 3D prints for the eye mechanisms, All I designed my own. As a CAD design software I used Rhino.
Please detail the experience of setting up the project using Raspberry Pi. We will need at least three photos to illustrate the setup/assembly process please.
Assembly process images you find here: xxxxxxxxxx
Did you have to go through several iterations in order to get it just right and what did you have to tweak, if so?
Of course the software developed step by step. In the very first version it was a problem, that the mechanical limits of servos within the mechanics were not respected. Therefore it was necessary to make sure a servo could drive its whole range, otherwise the servo would have reached a mechanical block and would burn through if not respected. Also after a replacement or re-build of the mechanics, every time a repeat ot the involved movement recording sequences were required. So I came across to the following solutions: All involved devices (input – joystick and output – servos) need calibration, so after calibration the input devices deliver a value range of 0 to 4096 from limit to limit. Similar is the calibration for output devices. They will reach their mechanical limits within the model when they receive the normalized value range in between 0 and 4096. Means a value of 0 moves the servo just to mechanical limit within the model and the value 4096 does the same but on the other side of the movement direction. Note that this implies each individual servo has its own calibration- or limit values. This method i found as essential. Furthermore, by using a normalized value range of 0 to 4096 – that is what will be recorded in fact – it becomes possible to replace servos or change the mechanics and the only thing that needs to be adapted are the calibration limit values for the involved servo, without the need to re-record movement sequences.
What software/code does it run on and has the setup changed as you have refined it over time?
The software is fully written in perl and can be used headless. It loads quickly and has a graphical interface for the teaching process (trackui.pl) . However installation is a challenge, because there are lots of devices and interfaces involved. Until everything is running well, it will take time … However thererfore I provide prepared SD card images you may download and write to a SD-card Then you only have to wire together the hardware and you are ready to go. For people who like to do the installation themselves I provide Instruction what needs to be done on my web site. But be warned it is not jus running straight throug. At lease for me it is always a time consuming thing to get everything running on a new OS-Build
Is the software available on GitHub or another open-source site? Any links you can share here would be great!
Yes, the software is available on GitHub under https://bechele/bechele The Perl diver for the PCA9685 Cip is on cpan https://cpan.org and the module name is: RPi::MultiPCA9685 – https://metacpan.org/pod/RPi::MultiPCA9685
How much did it cost to build and how long did it take? Are there any significant running costs? Were there any particular challenges or unexpected hurdles?
The hardware cost is rather low: You need of course a raspi (even a raspi 1b will do) and at least one PCA9685 PCB ( around 10€ ) and some model servos. My models use SG90 servos. They are not too reliable, but the price is un-beatable. Then of course you need some wires and a few push buttons. And not to forget a input device like a USB joystick or gamepad. However I found them as quite inaccurate – therefore I made my own serial port driven joystick. But it is up them, if people want to follow here. At least on my web site I provide a arduino based joystick. Should not cost more than 20 €. All in all for far less than 100 € you may dive into the project. Abount the hurdles: Neddless to say, that developing a new project offers tons of hurdles, but as always, if problems will be cut into small pieces you fix step by step, finally you reach the target.
How has using Raspberry Pi been beneficial to the project?
Without a Raspi or similar PCB it would be rather costly and more difficult to realize something like that.
How else do you think the ideas in the project could be used (if at all)?
Actually the projects use is not limited to ventriloquist like puppet plays, but every time you want to move things synchronised to sound, the project may be considered as a solution. So the use may be far beyond the shown application.
What advice would you give to someone who wanted to embark on a similar project?
Give it a try, if you are willing to spend some time as you always need if you want to realize something self made. The costs at least should not be an issue I think.
And spend enough time to precisely do the servo calibration. This pays itself back a hundred times.
What hardware will readers need if they want to make their own?
See further up …
Do you plan to do more with this project/with Raspberry Pi?
For now I am happy I went to this stage. However there are always steps ahead. For example it would be good to switch from WiringPi to PigPio, or some improvement in the user interface to ease teaching. But I think I wait for the feedback of the users – then let’s see whats required.
Finally, please tell us five fun/interesting facts about you or the project.
- Its super easy to get impressing results
- Teaching movement sequences is a rather quick process. The demo video song with the two yellow heads I made within about two hours or so. Keep in mind 24 Servos were involved.
- Probably the most difficult thing for the project is to build the mechanics.
- I also published for example 3D printable eye mechanics on thingiverse – here you find my designs under https://www.thingiverse.com/kakiemon/designs
- Anyway I made some more projects – thererfore visit: https://bechele.de
Many thanks for sharing your ideas and inspiration with us!