
Ok, the versioning may appear a bit confusing, since the previous “bechele 3” project uses software 2.0 and now we have just a new software with a lot of new features and this has Version 3.0. This version now supports new network node hardware in addition to PCA9685 devices.
Bechele …
is a Raspberry Pi, or better Linux, project that enables you to create movement models like hand puppets, dance puppets or animal robots or even whole groups of characters with simultaneous output of audio data and servo movement to awake these models to life, without the need of programming. You easily could for example animate a whole puppet rock band with many characters using this soft and hardware.
Instead of a Raspberry Pi, a OrangePi PC or any other rasperry pi like linux based micro computer can be used – For Raspberry Pi and OrangePi PC separate SD card images exists.
All required project scripts reside in folder /usr/local/bin/bechele on the Raspi.
All bechele software images or the tar ball may be downloaded from here, or from github: github.com/bechele.
https://my.hidrive.com/share/pc-obnpvxa
Software changes from Version 2.0 to 3.0:
For all programs:
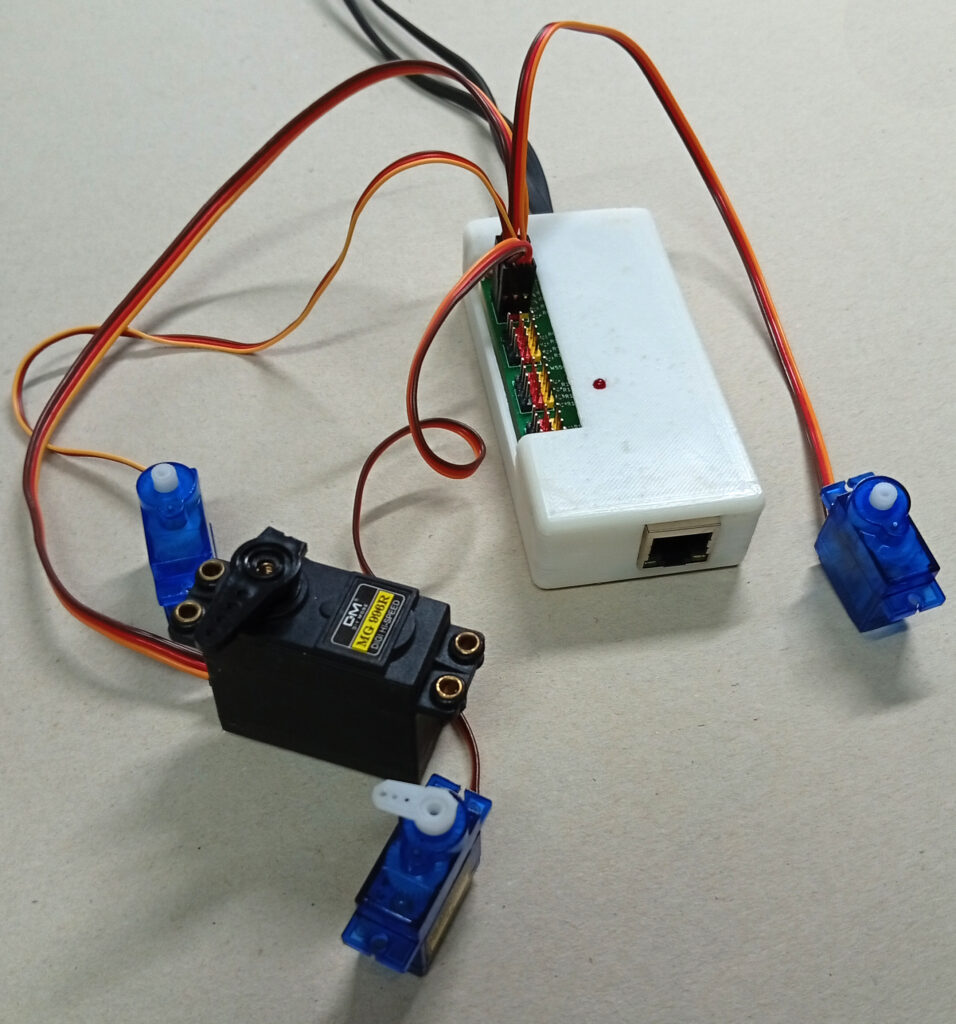
- Network nodes are new hardware devices to connect Servos or Relais modules to. The nodes are small and independent of the Raspi wiring. Since nodes just need power supply and depending of the configuration a Ethernet cable, or WiFi connection, installations may become huge with lots of nodes, servos and relais. All programs support network devices.
- Network devices and directly to the Raspi connected PCA9685 boards may work parallel. They do disturb each other if configured correctly.
- Now all programs take the configuration from the application specific file ConfigL.pm within the scene directory, that must be passed to each program during start of the program. This way, several different Scenes may exist parallel on a single Raspi. During start of trackui.pl with a new directory, ConfigL will be automatically copied from /usr/local/bin/bechele/Modules into this application specific directory. This means, if you want to change parameters for a specific application/scene you need to edit ConfigL.pm in its directory, not in /usr/local/bin/bechele/Modules.
trackui.pl:
- the setup of the servo bindings has moved into a seperate window that is opened at startup – otherwise acessible via button ‘Servo_Matrix’ The servo matrix, where servos to be teached are selected is now smaller and contains only one servo description for both, X and Y Joystick. Because the window is no more split into X and Y, there is much more space for notebook pages. So the number of displayable servos has drastically incresed. This is especially important for Installation with a big number of Servos/Relais. With the default small window size, already around 500 Servos may be displayed. By resizing the window, the number may be even increased a lot.
- new feature via button ‘Block_Operations’. Pressing this button opens a new window that allows to save and load movement blocks from and to file. This may be helpful, if special sequences need to be used sevral times.
- Soupport for GPM mouse, so the program also allows mouse support using the Keyboard and mouse and monitor directly connected to the Raspi.
- Operation of the program without mouse – only with keyboard is now possible.
- Now interprets comma separated servo names in ConfigL.pm as Relay setup. So the number of elements in the comma separated servoname will result in servo matrix entries (maximum 16 – 0-15 are allowed) for Relay control. So each entry visible in the matrix is for 1 bit. Joystick movements still control the binary state of the relais, where positions above middle will become 1 – relay on – and joystick position below middle become 0 – relay off. The Matrix bindings work for both, relais and servos the same way. They may be even mixed if this is desirable.
live.pl:
- New parameter $play_full_mp3 in ConfigL.pm, that stops the skip immediately to the next mp3, if the ‘next’ button on the button pad is pressed. So the software plays the running MP3 till the end, till it reacts to the next button press.
- New parameter $mp3loop This does change the default behaviour to repeat the last mp3 after the last mp3 has been reached. Parameter “mp3loop”: it may be important for unattended installations, where guests trigger the play of the scene by a light barrier or similar. At the end of all mp3 files, the session loops to the first mp3 again.
- Removed a bug in repeat mode where after the repeat sound, the repeated mp3 could not be interrupted by a new keypress.
New program nodeconfig.pl
- This program is used to setup the network nodes and prepare them to receive the desired servo or relais data.
- saves the node settings in a data base to be able to keep the overview on node’s configurations, especially if a large number of nodes is in use.
- Without a data base it would be difficult to keep track of the node functionsand configuration. The data base is located in the scene directory.
Basics
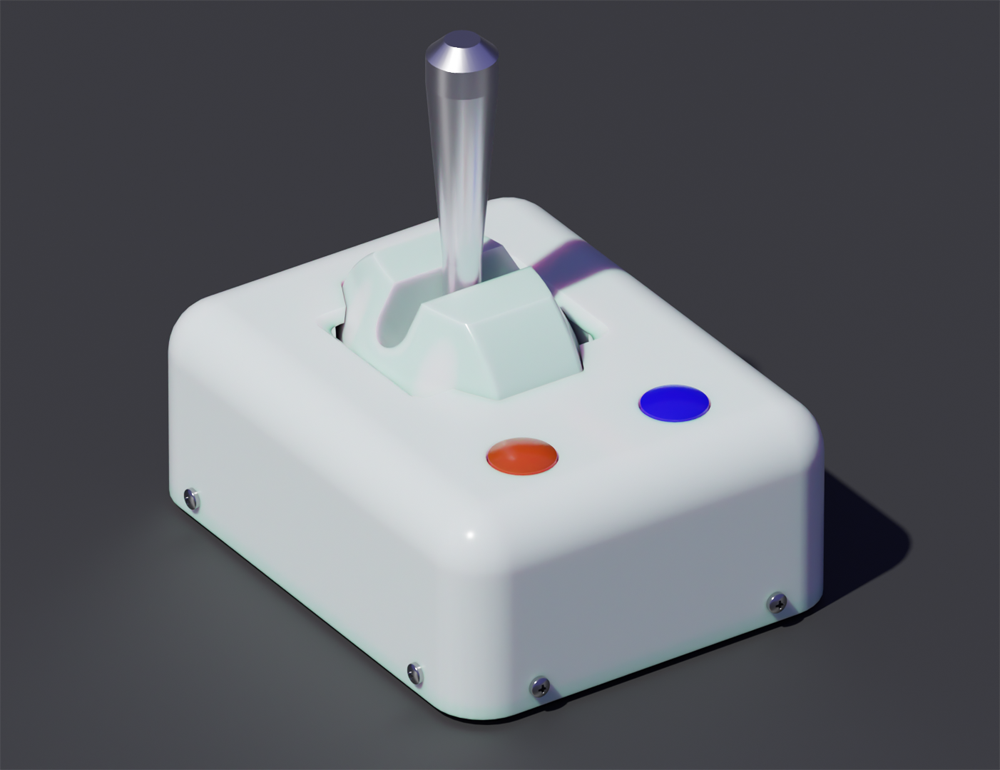
To run a movement robot syncronized to music or speech, it is required to add the movement in some way according to the tone. In this project this happens by moving a joystick by hand synchronous to the sound. At the same time the movements will be output to the servos to be able to check the results on the fly. The number of recording channels is not limited by software but by a bunch of environment conditions, since the latest version allows to use network devices for Servo and relais output in addition to the PCA9685 devices For the PCA 9685 devices there is a hardware limit of a maximum of 64 PCA9685 boards. For Network devices there are different limits: For 1 network packet of 1432 byte, approximately 700 Servos may be addressed and approx. 11000 Relais. Another limit is the chip timing for addressing all servos. Timing is depending on the refresh rate of the movements. Currently this is 50 ms or 20 Hz. With 20Hz refresh rate a maximum of approx. 120 Servos can be addressed using the PCA9685 devices. For network devices there is no such timing limit, if you do not need higher refresh rates. If you need to address more servos you need to change the refresh rate, otherwise there is not enough time to set all servos. In case of the example puppet heads, the number of Servos in use is only 24. This limitation is just coincidencial and not a limit for other projects. Because with a joystick only two channels can be recorded, the recording of all channels need to be done sequentially. In case of my samples I recorded first the mouth movements according to the speech audio mp3 file. Because mouth movements are very quick they need full concentration to acieve a more or less accurate result. Therefore I just recorded one channel only, though I had two channels available. Then I recoreded the eye lid movement with also only one channel but with two servos activated at the same (x) direction. Finally I recorded the eye movement with two channels at the same time. The audio data was divided in single short sections, to allow the puppet player to respond in the speech pauses. After finishing recording, audio data and movement can be output step by step by pressing a button, so that the audience has the impression the puppet really talks to the puppet player.
Working principle:
A movement set consists always of a mp3 sound file, and a .svo file that contains the movement information for the servos. Optionally a text file with the same name may exist, that contains text hints for the puppet player- in case you don’t want to learn all the dialogs by rote. This text will then be shown on the terminal window, you started the program from.
In the first version of the project, the positions of the joy stick were passed directly to the servos. There the value range of the joy stick needed to coincide exactly with the servo position values. This had the following disadvantages:
- The whole movement range of the servo needed to be possible for the servo.
- Different servo types could not be combined if the parameters differed.
- After changing mechanical parameters of a servo or joy stick, a mecanical re-calibration was required.
- Mechanical changes required a re-recording of the concerned movement. Therefore joy stick movements as well as servo movements will be parametrized and normalized to a range of 0 to 4096 in file ConfigL.pm. If for example a mouth movement of a puppet was realized, so that 2/3 of the possible angle range of the servo was in use and after a mechanical change just the half of the angle range is needed, existing movement file can be re-used without any change, by adapting the servo parameters. The same applies if the joy stick changes. The positions of 0 to 4096 in a movement file contains the complete possible mechanical movement range of the servo in the model. In other words: The servo – despite parametrized correctly – does never try to exceed its mechanical limits in the model.
New introduced network devices:
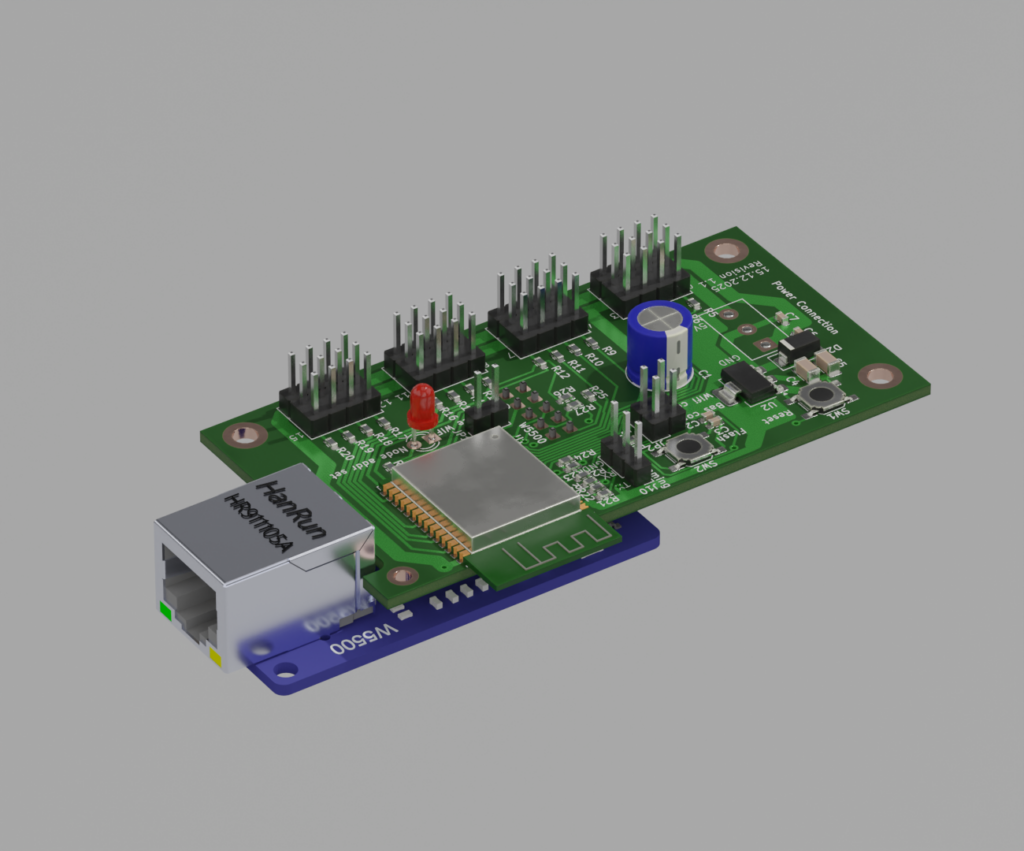
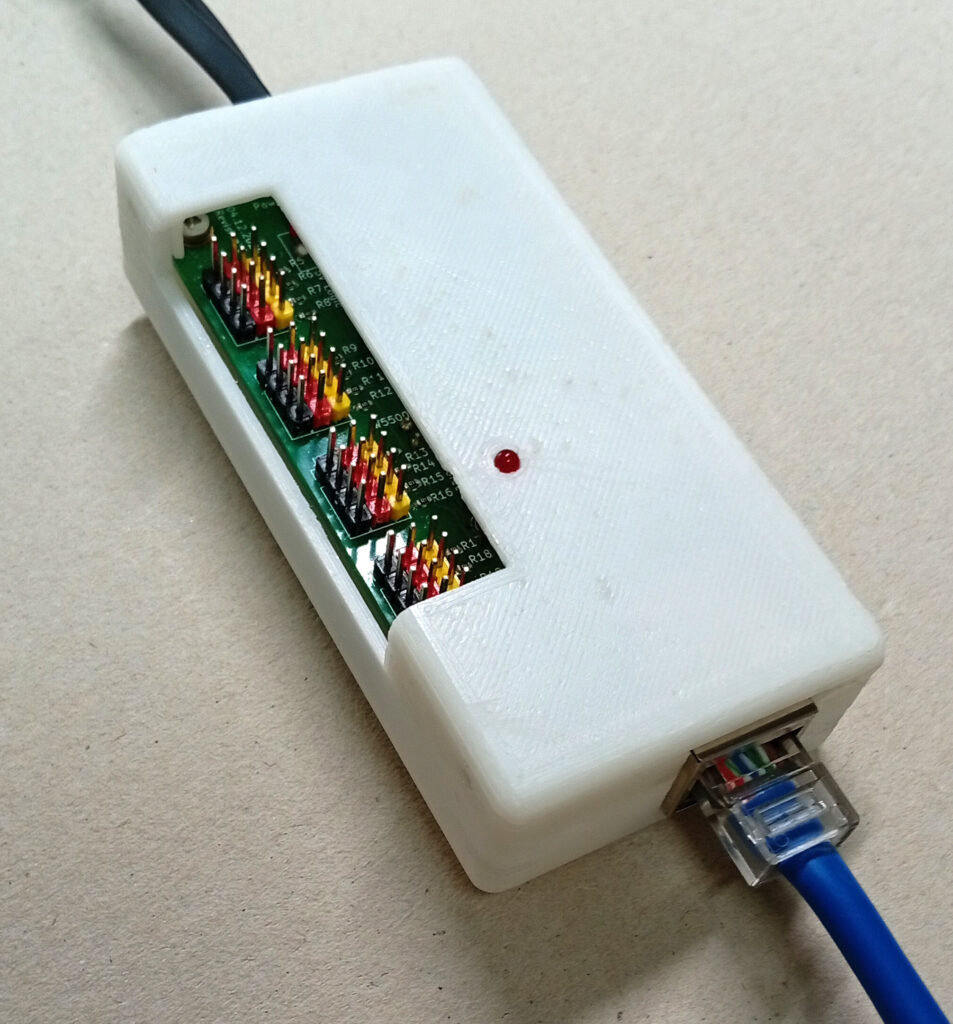
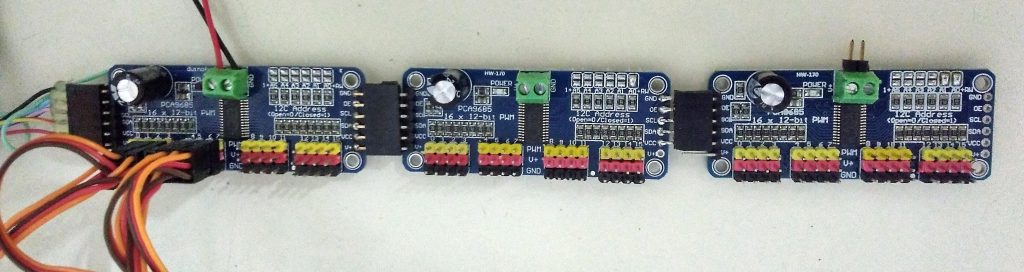
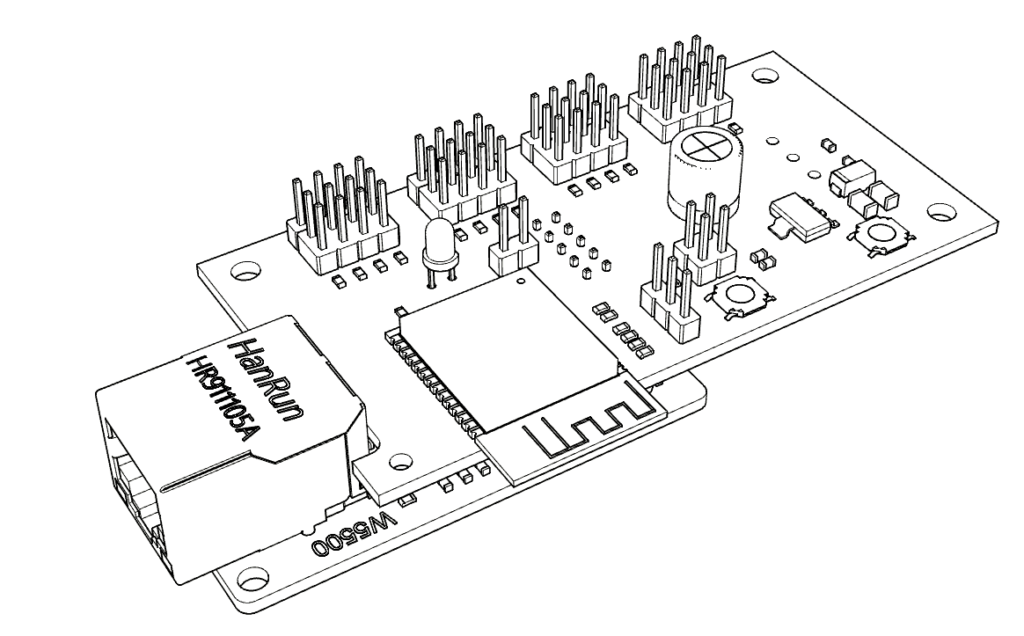
With the latest Software 3.0 the bechele software now supports beside the existing PCA9685 PWM Boards also network devices, based on cheap ESP32 modules. Each network device may handle 16 Servos or 16 Relais or a desired mixture of both. All the data transfers from the Host (Raspi) is realized using broadcast transmissions, where all devices (nodes) receive the same data packets. According to the node configuration, the node takes the data from the packet that is intended for it. This way there is plenty of time to drive 700 Servos @ 44 ESP32 nodes, or 11000 relais @ 700 nodes with a 50ms refresh rate. Network devices may be connected via Ethernet or WiFi. Of course Ethernet driven nodes are more stable than via Wifi.
Installation:
The easiest way is to write a pre-defined SD card image to a SD card and you are almost ready to go. For those who want to install themself, expect a time consuming installation marathon:
Unpack the tar ball into / (root) of your distribution. Depending on the linux distribution some software needs to be installed. How to install that depends on the distribution.
you need:
- cpanminus (required)
- WiringPi (required for RaspBerry Pi)
- git (required for OrangePi)
- make (required for OrangePi)
- gcc (required for OrangePi)
- WiringOP (required for Orange Pi – install with:
    after that > cd WiringOP < and then > ./build <)
    now > echo '/usr/local/lib' >> /etc/ld.so.conf.d/randomLibs.conf <
    and > ldconfig <
    test with > gpio readall < all gpios should be displayed
    )
- alsa-utils (required)
- mpg123 (required)
- i2c-tools (required) if you use PCA9685 devices
- perl 5 (probably pre-installed – required)
- perl-device-serialport (required)
- libncurses-dev (required)
- libncurses-dev:armhf
- libncurses5-dev (required)
- libncursesw5-dev
- libncursesw5-dev:armhf
- gpm
- libgpm-dev
Further you need to install some perl modules – easiest is to use:
cpanm <Modulname>
Many modules depend on other modules, so that the installation may take a while.
PERL MODULES:
- strict
- Socket
- RPi::I2C
- WiringPi::API
- RPi::MultiPCA9685
- Device::SerialPort
- Curses::UI
- Curses::UI::Mousehandler::GPM
- WiringPi::API
- File::Find::Rule
- File::Copy
- File::Spec
- File::Temp
- Text::Table
- Linux::Joystick
- Audio::Play::MPG123
- Time::HR
- Data::Dump
- POSIX
- DBI
- DBD::SQLite
- bigfloat
- ConfigL (This comes along with the tar ball and does not need to be installed)
After the installation, some parameters need to be set – see section configuration.
Programms and their function:
trackui.pl: (for joystick and gamepad)
Using this command you may record moves of you models servos. It processes on demand all mp3 files from the directory that has been passed as parameter during program start. To ease the use a quasi graphical user interface is in use (curses), that also works over a terminal program (for example putty).
Depending on complexity of a model or a puppet, movements will be generally aquired sequentially. Probably nobody may control all servos simultaneously, so a correct movement results. By using the user interface it’s possible to combine movements. For example several servos may execute exactly the same movement. The movement control of a servo group may be assigned to a joy stick axis. This is for example necessary if a puppet has seperate servos for each eye lid. You don’t want to record each lid seperately but record them togehter because they almost move together. If for an exception one lid shall be moved different from the other, you may record one eye lid in a subsequent record cycle by just defining a limited time range, instead of the complete number of movement steps within a single MP3 file. Depending on the number of servos and the complexity of your movements, you may repeat recording as often as you like with servos activated or de-activated as you need, until the movement fits to the sound as desired.
control elements of trackui.pl:
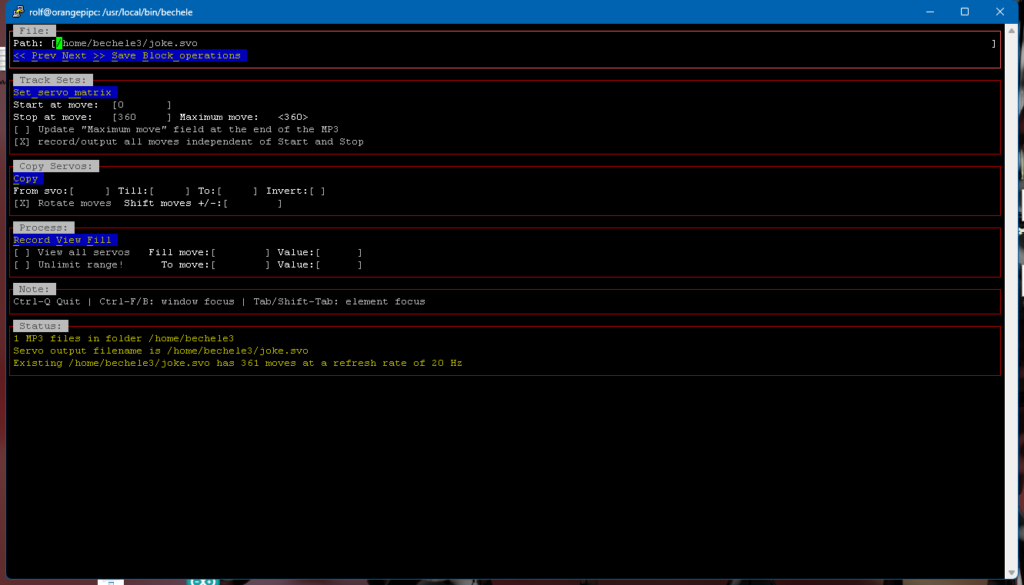
Section File:
Here you select the file (.svo/.mp3) to process. Usually you will process the files defined by passing a folder as a program start parameter. With << Prev Next >> you may move through the folder. The requirement is alway at least one existing MP3 file. For this file a belonging .svo file will be created or modified. If a .svo file already exists this may be output or modified. With the double arrows you may move in steps of 10 files. This is helpful if you want to navigate to a desired file quickly, because solution dependent, processing single files may be impossible or pedestrian. Save saves the .svo file finally. The button “Block_operation” opens a new window, with block save/load operations – see section “Block operations”.
Operation elements on the joy stick:
Key 1: starts recording or viewing (trigger).
Key 2: stops recording and returns to the menu.
Track Sets:
The Button “Set_servo_matrix” opens a new window, where you can define which servos or relais to process. See section “Set_servo_matrix” for details. A track contains all movement steps that corrospond to a mp3’s play duration. In the default setting, movements will be recorded every 50 ms (20Hz). A 20 second MP3 results then in 400 movement way points.
Start at move: Is the start time of a record in steps of ‘$ConfigL::stepwidth’
Stop at move: Is the stop time in steps of ‘$ConfigL::stepwidths’
Using these fields only a fraction of the mp3 time may be recorded or viewed. The Check box ‘Update “maximum Move” field at the end of the mp3’ controls that after the MP3 has finished, the number of movements at the end will be noted in field “Maximum move:” After reloading a new MP3 where no .svo file exists, the box will be checked automatically, so the determination of their maximum number of moves will take place with the first recording, after it will be unchecked automatically. This process can be repeated manually at any time by checking the box and a subsequent recording till the MP3 ends. The Check box ‘record/output all moves independent of Start and Stop moves’ allows to output or record for the complete time range from start to the end of the mp3. This is helpful, if you want to limit the recording time to a fraction of the whole mp3 length, but want to see the results within the full time range. Then you can toggle recording/viewing time by setting the checkbox. ‘Start at move’ and ‘Stop at move’ fields are also used in conjunction with the ‘Copy Servos’ section. Here they limit the fields to be copied.
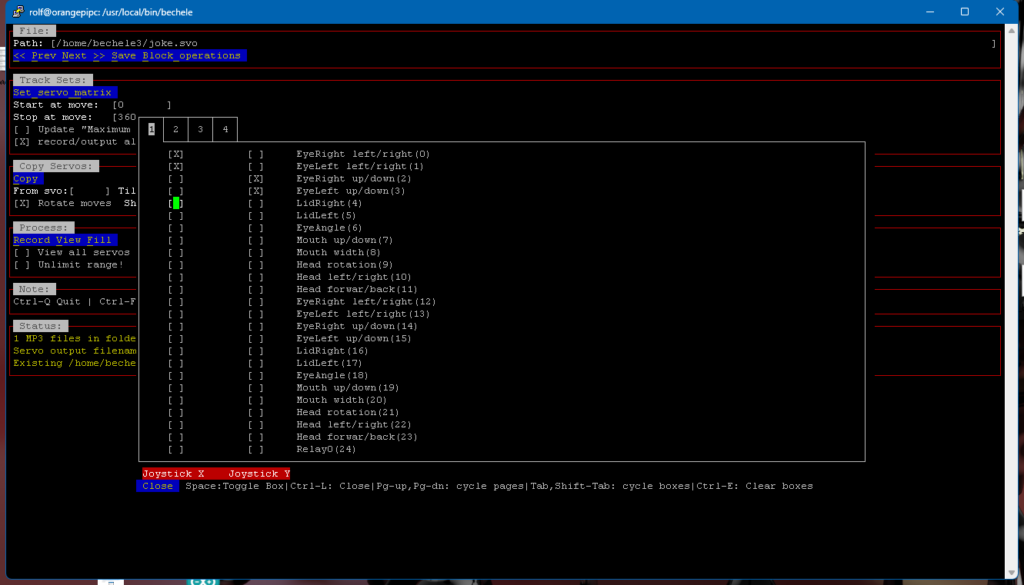
Set_servo_matrix: Here you may activate the servos, that shall be recorded during the cycle by moving the joy stick X-direction. By activating one or more check boxes the servos will be bound to the Joy stick axis for a subsequent recording walk trough. After the walk trough you may select other servos and make a new walk trough. Not selected servos remain then unaffected. You almost activate only one servo at a time, but several may be selected. These will then be moved and recorded simultaneously. Since the software may need to handle lots of Servos, the Window is devided in notebook tabs. Depending on the Servo and Relais definitiion in ConfigL.pm, you may see more than one notebooks, or even lots of them. With the new software 3.0 both, X and Y servo bindings will be shown in the same window. So finally it is easier to keep the overview. If you selected several servos or relais at once, you may use the key combination Ctrl-e to clear all ckeck boxes at once.
Copy Servos: Here you may copy already captured movements to other servos. The copying process respects the values in ‘Start at move’ and ‘Stop at move’ and copies only the range specified. This is helpful if you want to copy only the moves within a certain time slice of a complete servo track. With the ‘Copy’ button you start copying the defined ranges. It is possible to copy serveral servos at once by defining a servo range using the ‘From svo:’ and the ‘Till:’ fields The range spans the number of servos to copy. The servos within the span then will be copied to the destination in the ‘To:’ field. The ‘To’ field is the first position to copy to. Other servos in the span will be copied to subsequent servo numbers, until all servos within the span are copied. Overlapping servos and/or movements are not a problem, since the content is buffered before writing. It is also possible to ‘shift moves’ within movement sets of servos by a arbitrary number of steps in either direction, indicated by a positive or negative number. It is possible to set the ranges for servos and also for Start and Stop moves to decending or ascening. Accordingly the reading of the range is swapped, which results in an output of the movements in the opposite direction. For example if you set Field “From svo:” to 10 and the ‘To:’ field to 4′ and ‘To move:’ to 14, The content of Servo 10 goes to servo 14, 9 to 15, 8 to 16 and so on. The same applies to ‘Start at move:’ and ‘Stop at move’. All copy, movement and shift steps may be done in one go. The processes do not interfere each other. Checkbox ‘Rotate exceeding moves’ makes sure, moves, that exceed one end, will be rotated to the other end. For example if you shift the complete range of moves by +100 and you have a ‘Maximum Move:’ value of 550, (Start=0,Stop=550, all moves will be shifted by that number of steps, means move 550 becomes 99 (because wrapped around) and move 0 becomes 100. OK, copying this way may be a little confusing, but may save you a lot of time. In addition it is possible to invert the servo movement direction during the copy process using the check box “invert”.
Process: Record starts a recording according to the servo activation. Not activated servos will be played only. All servos de-activated is the same like ‘view’, except, that no values are displayed if “view all servos” is not active. View outputs MP3 and movements only. ‘View all servos’ when active, shows all servo movement values of all servos. ‘View all servos’ when inactive shows only the servo values of the activated servos in the servo section. This helps often to keep the overview, when many servos are configured.
Process: Fill You may fill movements within servo movements with a value vector. When you click onto ‘Fill’ all acctivated Servos will be filled with the vector defined using the fields ‘Fill move:’,’Value:’,’To Move:’,’Value:’. For example, if you put here 100 0 400 1000, Move 100 in the selected servo(s) will get value 0, Move 400 will get value 1000 and for example move 150 will get 500 and each move in between gets a different value along the vector from 0 to 1000. Also here vectors may be ascending, descending on may remain the same over the complete range, depending on your settings. Since Fill may be also used to fill the relais data words – (1 word keeps 16 bits reflecting 16 possible relais output pins) – There arises a small issue, because Servo data only uses 12 bits (0-4096), but Relais words need up to 16 bits (0-65535). If you would fill Servo data position words with 16 bits, the result would be unpredictible. Therefore usually field values will be checked before saving them, so Servo values never exceed 4096. In rare cases, where Bitdata is required for a network node having all 16 bits configured for Relais, you would not be able to set the bitpattern for all 16 pins. For this rare case the button “Unlimit Range” exists. However, it is rather unlikely, that a node has configured only relay pins. Usually it is rather only servos, or a few relay pins in addition. Only if you exceed 12 relais on on node, you may use this option. See section “nodeconfig.pl” for details.
Block_operations:
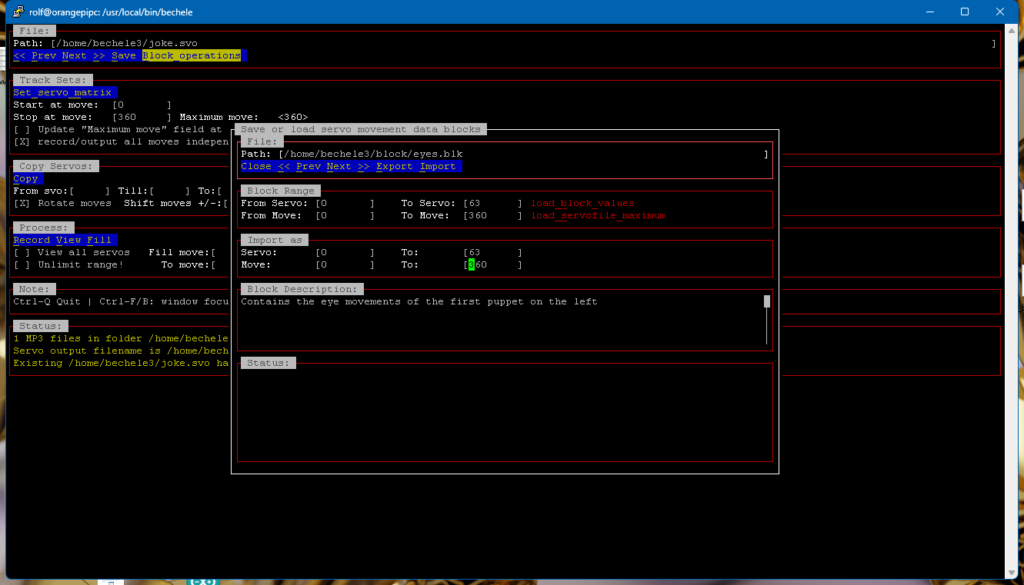
With this new utility you may save and load blocks of already existing servo or relais data to or from a file. I the file section you may toggle or jump through existing block files in the directory shown or entered in the Path: field. By pressing “Export” you write the data specified in Section “Block Range” . By pressing “Import” you import a previously saved block. If files exist and you toggle through them, the data range will be shown in the fields. If you want to load a saved block only partially, you may change the fields in “import as”. The block description Section can be edited and will be saved along with the file. Describe the block as you like to find it later easily. The more blocks you save, the more important becomes the description.
Status: Here useful program messages will be shown.
The program exits with Ctrl-Q
Tips for the screen settings of trackui.pl:
To ease the operation of the servo teaching process according to music, you may adapt the number of shown servos in the interface in one row, according to your terminal screen size. On a big screen you may have more servos in a row on a smaller screen you may need to reduce the number of servos in a row to fit into the screen. If not all defined servos fit into one row, the interface puts the remaining servos into a new tab or notebook. Depending on the overall number of servos defined, the number of notebooks may be large. To toggle trough the notebooks (servo pages) press button PgUp or PgDn on your keyboard. To set the number of servos per page you need to modify the parameter “$num_servos_per_row” in Modules/ConfigL.pm If you get the message “The sceen is currently too small ..” try to reduce this value, use a larger screen or use a smaller terminal font.
Important Note: If you once created a servo (.svo) file the number of servos cannot be increased any more via the config file Modules/ConfigL.pm To increase the nuber of servos you need to delete the .svo file manually. So it is a good idea to consider the number of servos you need before starting with recording.
live.pl
This program outputs during the presentation the sound along with the recorded movements. The sorting of the files follows the ASCII sequence. The program will be only controlled using the four buttons of the control button panel. The joy stick is not needed and normally disconnected.
Button 1: Start of the first sequence or switching to the next sequence.
Button 2: Start of the previous sequence
Button 3: Repeats of the previous sequence with output of the repeat prefix sequence from folder “repeat” of the output directory. If more than one sequence resides there the following sequence (mp3 file) will be uses as a prefix. The idea is to have a possibility to repeat a sequence if it was for example too loud in the audience to understand.
Button 4: Outputs the next sequence in folder “extra” of the output directory. If several sequences are stored there, with each repeat the following sequence will be output. Folder extra may be just a laugh or a reaction sequence to the audience.
nodeconfig.pl
This application is needed to set up network devices – also called nodes – Nodes have a network interface, they may receive data whether via WiFi or Ethernet. Nodes are listening to broadcasts on UDP port 7625. UDP data packets will be sent from the Master – in our case usually a Raspberry Pi or similar. These packets may contain, whether servo and relais data, or configuration commands. In fact, data words for Servos or for Relais do not differ. This means Relay data can be easily output by a servo movements and Relais words as Servo movements. Only the node configuration defines what is used as Servo or relais data. nodeconfig.pl will send configuration commands to nodes to allow them reacting to later operation data packets in the configured way. In order to receive and output data commands as servo or relay actions, each node needs to be configured, since operation broadcast datagrams may contain data for multiple nodes. nodeconfig.pl sets up, which data in the datagram is intended for the node to be configured, and how this data is used inside the node. To be able to configure a specific node, it first of all needs a node address. A new, empty node, has initially no node address. The node address is configured over the network using a basic configuration command. By setting the jumper “Bas Conf” on the nodes hardware, the node is made sensitive for the basic command. The basic command sets the node address and also the MAC address of the node. This implies, that only one node’s “Bas Conf” jumper in the network at a time must be set. If more than one node in the network has the same MAC address, you probably encounter trouble in this network, so it is essential to pass each node a different node and MAC address. nodeconfig.pl supports you in this matter, but it cannot prevent you always in doing something wrong, so keep this in mind.
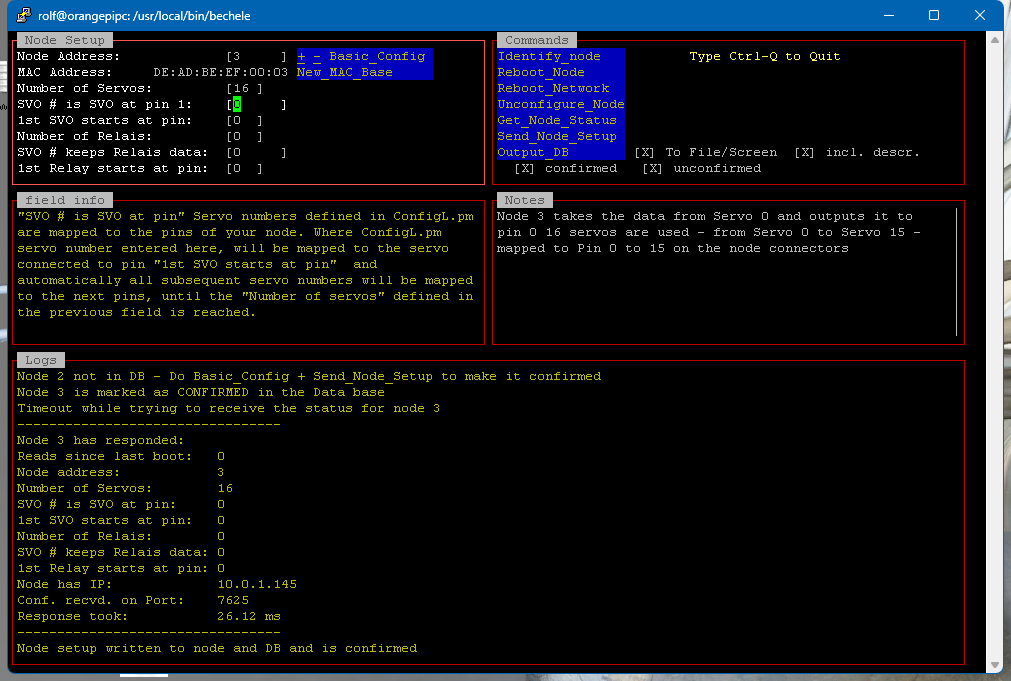
Buttons, fileds and controls in nodeconfig.pl:
- “Node Address:” is the unique number of the network or wlan box (node), you may connect servos or relais to. The node address can be only transferred, if the “Base Conf” jumper is set on the node. Make sure not to give two nodes the same node number !
- “MAC Address:” is the network address of the node, that must be unique within your ethernet network segment. The last two bytes of the MAC address are the node number in hexadecimal format. To change the Base, press the button.
- “New_MAC_Base”. The MAC can be only transferred, if the “Base Conf” jumper is set on the node. Make sure to set only one node jumper at a time!!!!!!! Otherwise you mess up your network !!!!!!’
- “Number of Servos:” defines how many Servos are connected to this node. The range is 0 to 16. If a node shares its ouput pins with relay outputs, the pins must not overlap. Servo outputs and relay outputs may start at higher numbers. So both, relais and servos may be connected to same node.
- “SVO # is SVO at pin” Servo numbers defined in ConfigL.pm are mapped to the pins of your node. Where ConfigL.pm servo number entered here, will be mapped to the servo connected to pin “1st SVO starts at pin” and automatically all subsequent servo numbers will be mapped to the next pins, until the “Number of servos” defined in the previous field is reached.
- “1st SVO starts at pin” The Servo number set in “SVO # is SVO at pin” will be mapped to this pin of your box. The range is: 0 to 15. For example: If you set ‘Number of Servos’ to 5 and “SVO #…” to 10 and “1st SVO…” to 4, then Servo10 configured in ConfigL will be mapped to Pin 4 of your box, Servo11 to pin5 .. and Servo14 to Pin 8.
- “Number of Relais” defines how many relais are connected to this node. The range is 0 to 16. If a node shares its ouput pins with servo outputs, the pins must not overlap. Servo outputs and relay outputs may start at higher numbers. So both, relais and servos may be connected to same node.
- “SVO # keeps Relais data” Relais are controlled out of servo data, where one servo position contains 16 bit = maximum 16 relais. This servo number defined in ConfigL.pm will be mapped to the pins of your node. If a node has only relay outputs, and the “Number of Relais” is 16, Each bit of the servo data word will be output to its referred pin of the node.
- “1st Relay starts at pin:” This value is important, if a node shares servo and relay pins. It defines where the relay bit data will be mapped onto the output pins. For example: If you have 12 servos and 4 relais for your node, then the ‘Number of Servos’ becomes 12, the “Number of Relais” becomes 4 and the ‘1st Relay starts at Pin:’ becomes 13.
- “BasicSetup” Sends the node address and MAC to all nodes with set “Bas Conf” jumper. !Warning!: only one ‘Bas Conf’ jumper must be set at a time.
- “Identify Node” Pressing this button will send a blink command to the node. This is to be able to identify a node, in environments where several nodes are installed.
- “Reboot_Node” Forces to reboot the node.
- “Reboot_Network” Forces to reboot all nodes in the whole Network.
- “Unconigure_Node” Unconfigures all values of the node. Keep in mind you need to re-configure all node parameters, including the need to set the bas conf jumper after this command. Use with care !!!!
- “Get_Node_Status” Requests the configuration status from the node and displays it if received.
- “Send_Node_Setup” Sends all node specific configuration data at once, of course excluding node address and MAC
- “Output_DB” This button outputs a database list to file or screen using the checkbox options provided.
nodeconfig.pl and its data base:
All node configuration attempts, means pressing the button ‘Send_Node_Setup’ and ‘Base_config’ attempts will be stored in the data base nodeconfig.db that resides in the configuration directory of a session. At the end of a ‘Send_Node_Setup’ command, the node is requestesd to respond with its configuration. If the received configuration matches the sent one in the data base, the node will be marked with confirmed. This tells, that the node is really set up as shown in the data base. If a node is not marked as confirmed you may try to resend the configuration. Once a node is in the data base its settings will be shown in the fields. This means, re-sending a configuration is just one click away. In a real installation it is recommended to note the node number on the nodes case, so it is easy to keep an overview on large installations.
new Parameters with Bechele 3.0
With Bechele Software 3.0 new parameters in ConfigL.pm have been introduced:
- “mp3loop”: Is relevant for live.plIs relevant for live.pl It may be important for unattended installations, where guests trigger the play of the scene by a light barrier or similar. At the end of all mp3 files, the session loops to the firs mp3 again.
- “play_full_mp3”: If set to 1, the default behaviour to skip immediately to the next mp3 file changes. So a mp3 along with its movements is played always fully. With a new trigger the next file will then be played.
- “netport”: this is the port the network deviced use to receive boroadcast movement data. Keep this number always on the defaults. If you change it, you need to change the port also in the ESP node firmware. This means the firmware needs to be re-compiled.
- “sendtonet”: needs to be set to 1 if network devices shall be supported.
- “sendtopca”: needs to be set to 1 if directly connected PCA9685 boards shall be supported.
- “block_popup_width”: Defines the width of the block operation setup window.
- “matrix_popup_width”: Defines the width of the actuator matrix window.
- “max_out_pins”: Number of pins supported by ESP network devices.
- “dboutlist”: Defines the output file name and path for database summary files of nodeconfig.pl
servokalib.pl (2-channel) and servocalib-single.pl (1-channel)
This program is used for a first test of new servos and to determine the servo and joy stick parameters. It is more or less self explaining. Here you need to have the joy stick or a gamepad connected.
Operation elements on the joy stick:
Key 1: switches the joy stick to the next servo.
Key 2: switches the joy stick to the previous servo.
X-pos(0-4096)   |Y-Pos(0-4096)  |Joystick X |Joystick Y |Servo 0    |Servo 1
-----------------------------------------------------------------------------
2714            | 1602          | 460       | 317       | 438       | 307
In file …configdir/ConfigL you need to enter the limits – see the hints in the file itself.
files in /usr/local/bin and /usr/local/bin/bechele
- backup Shell script that saves the actual configuration as a tar ball in: /usr/local/backup
- activate_autostart running this once under Linux systems using systemd services, the program live.pl will be started automatically after booting. This is helpful if no terminal is connected to the raspi. Runs only on distributions that support systemctl.
- deactivate_autostart De-activates the automatic boot into live.pl
- cksum.pl helper file that checks the file integrity of .svo files.
- gamepad.pl helper program to figure out the button and axis numbers of a new gamepad.
Recording tips:
Create your audio files with a longer silence at the end. So the puppet may continue to move while the puppet player responds. When the button for the next sequence will be pressed, the current will be stopped immediately and the subsequent one starts. Better record the model movements a bit longer, so the puppet does not look “static” in speech pauses.
Configuration:
After installation, parameters perhaps need to be modified, before you may start with playing or recording.
Setting up program parameters:
- $use_gamepad=1; if 1 the gamepad will be used as input device if 0 the self made joystick
- $joystick_device=0; The linux joystick hardware device – 1 or 0
- Serial port ($serialport) According to the hardware in use.
- i2c port ($i2cport) According to the hardware in use.
- i2c Adress ($i2c_address) According to the address in use. (tip: detect with i2cdetect )
- $stepwidth=50000000 The refresh rate in ns (Nanoseconds) at which moves will be captured and output Defaults to 50 ms or 20Hz.
- $sendtopca activates to send data to the PCA9685 devices connected directly to the GPIO Port of the Raspi.
- $sendtonet activates to send data to the network via broadcast The node receiveing the data needs to be setup on which data it reacts, since all servo and relay data is sent onto the network in one packet.
- $max_out_pins always 16 for the current ESP32 nodes.
Setting up the number of servos in use:
Edit file: /usr/local/bin/Modules/ConfigL.pm Change the entry: $num_servos=57; # number of servos in use – not limited.
Of course you need these Servos set up in the data structure of $servosettings. And the structure must contain that many entries. With the default ConfigL:pm file 64 Servos are prepared in the data structure $servosettings. So if you want to use more than 64 Servos, you needto extend this data structure. Just duplicate some of the lines in the middle to get more servos.
Setting the refresh rate of the servos
(how often a new movement paramete will bes sent to the servo). The cycle time is in ns (Nanoseconds) the default is 50000000 this is a frequency of 20 Hz. To change the default, change parameter stepwidth=50000000; in File ConfigL.pm Please note, that the stepwidth will be overwritten during the loading of a servo (.svo) file. In other words, as long as you have a svo file, the parameter in the ConfigL.pm has no effect. To change the refresh rate, you need to delete the .svo file and restart trackui.pl or load a svo file with a different refresh rate.
Setting up the joy stick.
Assume a joy stick delivers at minimum position a value of 123 and 855 at maximum. By entering these values into ConfigL.pm, these values will be converted internally into 0 to 4096. If you move the stick to minimum a inner value of 0 will be used and if the stick goes to maximum a inner value of 4096.
Adapt in ConfigL.pm values:
$joystick_x_start, $joystick_y_start, $joystick_x_end, $joystick_y_end, (joystick)
$gamepad_x_start $gamepad_y_start $joystick_x_end $joystick_y_end (gamepad)
For a gamepad the following parameters define the button and axis assignments, for later use of the controls:
- $gamepad_start=0; # define which gamepad button starts
- $gamepad_stop=1; # define gamepad button that stops
- $gamepad_axis_y=1; # define the gamepad axis y
- $gamepad_axis_x=2; # define the gamepad axis x
The referring numerical values will be displayed within gamepad.pl. So this helps to figure out which button has which number.
Setting up a servo:
With servos we have the following parameter sets:
- The whole possible movement range of a servo (not mounted in the model). This is used to parametrize the servo type so when running servocalib.pl, the servo is already preset and reacts accordingly. (servolimit start + servolinit end)
- The possible movement range within the model. This is used to limit the servo movement inside the model in its mechanical limits, so the servo does not try to overrun the mechanics. (servostart + servoend)
- The movement direction. (1 or 0).
0 outputs the movement like the joy stick.
1 inverts the movement opposite to the joy stick - Servolabel: Here you may enter a text that later names the servo in trackui.pl
Tips for setting up:
- In any case prevent the servo from trying to exceeds its mechanical limits. Especially cheap servos like SG90 don’t appreciate that and burn trough.
- First set up the joy stick using servocalib (without connecting servos) and then set up ConfigL.pm. Check in a second run, if you reach 0-4096.
- Only then connect !one! servo that is not mounted in your model, put the stick to the middle, determine the limits and enter them into ConfigL.pm at the positions for servolimit_start and servolimit_end.
- now re-run servocalib.pl and check, if the servo just moves to its limits when you move your joystick fully to the maximum and minimum. A servo value of 0 must move the servo to its first limit and a servo value of 4096 must move the servo to its opposite limit. If this is working nicely withot gaps or overruns, the servo limits are correct. Usually servos of the same type have about the same limits, so taking over the values from one servo definition to the other servos is normally possible.
- Now place the servo into your model and re-run servocalib. Determine the mechanical limits of your model for this particular servo. Once you have the two limits, enter them into ConfigL in the fields for Servostart and Servoend.
- following this procedure allows you to change a servo to a different type without the need to re-capture existing movement files. So it is worth to be exact at this point. By re-adapting just the four limits later, you can replace servos and movements sequences and keep existing movement files. In other words movements become normalized.
Hi – I came upon your website and video of puppet animation. I am attempting something similar but having no success. I have no understanding of computer code or electronics at all so I will have to find a different way. I am a musician with music software that can record and output midi data. I have a control surface for the software which has a moving fader that controls, for example, volume automation for a music track. It is simple to write in the fader movements and they are endlessly repeatable. So – if I create a silent track with volume automation in the software, and have that running alongside my music track I could connect a wire or string etc to the fader and use that movement as a starting point to make simple movement in a model, synchronised to my music.
That’s all fine in theory but is a bit crude. But I could make it work. My question is – can you suggest any other way that would allow me to control servo motors with volume automation data via midi to get the requires result – avoiding any need to write computer code? I have experimented already with a board called an SRV-4 made by a company called Omega electronics and three small servos and a power supply – but I can’t get it to work at all. Many thanks if you can offer help.
Dear Brian, as you propably noticed, my software is based on previously done recordings synchronized to music to animate any kind of movements or even light effects. As I understand you want to control some kind of puppet using the control signals for faders. So I think my software is not the best choice for your application. However, I could imagine, you could use my software, if you pre-record sequences and start them using a trigger signal, that comes once via MIDI at the beginning of your song(s). If you record a MP3 (just internal for the sync – not to output to the audience) from your MIDI file , movements could be synchronous to your music. I had a quick look at the Board you mentioned, and it looks OK for the first view. I guess you tried to operate the board according to the company’s instruction: https://j-omega.co.uk/wp-content/uploads/2022/07/srv4install.pdf. After a fist view of the document I am still in doubt, how that works in detail, but that may be, because I do not know much about MIDI. If you cant get the board working, I would recommend to get in contact with the manufacturer, because they claim it works. I hope you find a solution for your problem.